Your AI assistant is about to learn where every IP address in the world lives. The whole thing takes one API key, one JSON block, and about five minutes.
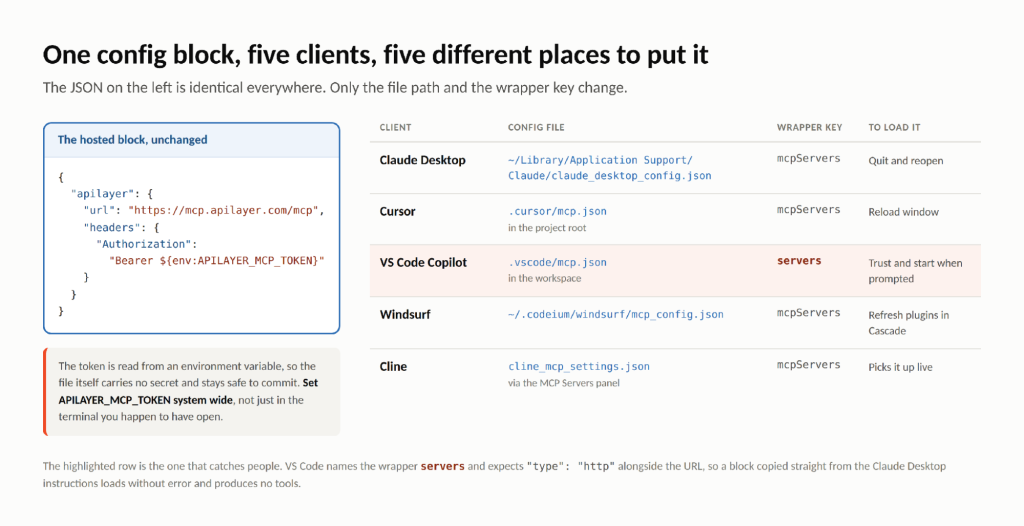
What follows is the same configuration five times over, because that is genuinely all it is. The ipstack MCP server speaks one protocol, and every client on this page speaks it too. What changes between them is which file the block goes in, what the outer key is called, and what counts as a restart. Get those three right and the tools appear.
Setting up the ipstack MCP server takes three steps: get a free ipstack API key, add a short JSON block to your AI client’s MCP configuration, and restart the client. You can point the config at the hosted server at https://mcp.apilayer.com/mcp with a token, or run it locally with npx @apilayer/mcp-server. The same configuration pattern works in Claude Desktop, Cursor, VS Code Copilot, Windsurf, and Cline.
Key Takeaways
- Setup is three steps: free API key, one JSON block, restart the client.
- The hosted endpoint at mcp.apilayer.com/mcp needs zero maintenance; use local npx @apilayer/mcp-server only when traffic must originate from your machine.
- One token works across every client at once, and all calls share the same ipstack plan quota.
- Keep the token in the APILAYER_MCP_TOKEN environment variable; never commit it to git.
- Location fields return on any key, while timezone, currency, connection and security fields arrive once your plan includes those modules.
Prerequisites (2 Minutes)
Three things, and two of them are optional depending on the route you take.
- A free ipstack API key (no credit card required).
- Node.js, only if you choose the local npx route.
- Your AI client of choice: Claude Desktop, Cursor, VS Code with Copilot, Windsurf, or Cline.
Collect the key first. Everything after this point assumes you have it in front of you, and the sign-up flow hands it over on the same page rather than by email.
Remote or Local? Pick Your Mode
Use the hosted endpoint unless you have a reason not to: there is nothing to install, nothing to update, and it works identically in every client. Choose the local mode when company policy requires API traffic to originate from your own machine, or when a corporate proxy blocks outbound MCP connections.
Hosted config, which works in every client below:
					{
  "mcpServers": {
    "apilayer": {
      "url": "https://mcp.apilayer.com/mcp",
      "headers": {
        "Authorization": "Bearer ${env:APILAYER_MCP_TOKEN}"
      }
    }
  }
}
Local config:
					{
  "mcpServers": {
    "apilayer": {
      "command": "npx",
      "args": ["@apilayer/mcp-server"],
      "env": { "APILAYER_MCP_TOKEN": "{env:APILAYER_MCP_TOKEN}" }
    }
  }
}
The part worth understanding before you paste either one is {env:APILAYER_MCP_TOKEN}. That is a reference, not a value. The client reads the environment variable at launch and substitutes it, which means the key itself never lands in the file, and the file stays safe to commit alongside the rest of a project.
The catch is what “at launch” means for a desktop application. Exporting the variable in a terminal makes it visible to that terminal and to nothing else, so a GUI client launched from the dock never sees it. On macOS, set it in your shell profile and start the app from the same shell once, or use launchctl setenv. On Windows, set it under System Properties and Environment Variables, then sign out and back in. On Linux, your desktop session reads it from the profile at login. This single detail is behind most of the 401 errors people hit on their first attempt.
Add the ipstack MCP Server to Claude Desktop
- Open claude_desktop_config.json: on macOS at ~/Library/Application Support/Claude/claude_desktop_config.json, on Windows at %APPDATA%\Claude\claude_desktop_config.json.
- Paste the hosted config block and save.
- Set the APILAYER_MCP_TOKEN environment variable to your ipstack API key.
- Quit and reopen Claude Desktop. The ipstack tools appear in the tools panel.
Step four is stricter than it sounds. Closing the window leaves Claude Desktop running, and a running client re-reads nothing. Quit it properly, from the menu or the tray, then start it again. If the file was empty before you began, remember that it needs to be a complete JSON document, so the outer braces belong there even when apilayer is the only server you have configured.
[Editor: insert the Claude Desktop tools panel screenshot here. Alt text, exactly as the brief specifies: “Claude Desktop tools panel showing ipstack MCP server lookup tools”.]
Add It to Cursor
- Create .cursor/mcp.json in your project root, or open Cursor Settings and choose MCP for a global server.
- Paste the same hosted config block.
- Reload Cursor. The server shows a green status in the MCP panel and the tools become available in agent chats.
The choice in step one is worth a moment. A project file travels with the repository, which suits a team who all want the same lookups available in the same codebase. A global server follows you into every project instead, which suits the way most people actually use IP lookups, since the question tends to arrive from a log file rather than from the code in front of you.
Add It to VS Code Copilot, Windsurf, and Cline
Three clients, the same block, three small differences in where it goes.
VS Code Copilot
Create .vscode/mcp.json in your workspace with a servers entry using the same URL and Authorization header. VS Code prompts you to trust and start the server; the tools then appear in Copilot’s agent mode.
Read that first sentence carefully, because it is the one deviation on this page. VS Code names the wrapper servers rather than mcpServers, and it expects an explicit type alongside the URL. A block copied straight from the Claude Desktop instructions parses cleanly, raises nothing, and produces no tools at all, which is a frustrating way to spend twenty minutes. The VS Code shape:
					{
  "servers": {
    "apilayer": {
      "type": "http",
      "url": "https://mcp.apilayer.com/mcp",
      "headers": {
        "Authorization": "Bearer ${env:APILAYER_MCP_TOKEN}"
      }
    }
  }
}
Windsurf
Add the same block to ~/.codeium/windsurf/mcp_config.json, then refresh plugins from the Cascade panel.
Cline
Open the MCP Servers panel in Cline, choose configure, and paste the block into cline_mcp_settings.json. Cline picks it up without a full restart.
Run Your First Lookup to Verify It Works
Ask for something you can check by eye. This prompt uses ipstack’s documented example address, so you know what a correct answer looks like:
					Use ipstack to look up 134.201.250.155 and summarize the location,
ISP, and threat flags.
Before you read the answer, one thing to know about coverage. Location fields come back on any key, including a free one. Timezone, currency and connection data belong to modules that start at the Basic plan, and the proxy, VPN and Tor flags belong to the security module on Professional Plus. So a thin answer here is a plan boundary rather than a broken configuration, and the fix is a plan change rather than an hour in the JSON. On a key that includes every module, the reply reads like this:
134.201.250.155 is in Los Angeles, California, United States (zip 90013), at latitude 34.0453 and longitude -118.2413. The timezone is America/Los_Angeles and the local currency is USD. The connection belongs to ASN 25876, Los Angeles Department of Water and Power. Security flags are clear: not a proxy, not a Tor exit node, threat level low.
Behind that paragraph sit the fields the assistant actually read: city, latitude, longitude, time_zone.id, currency.code, connection.isp and security.is_proxy, all documented in the ipstack API documentation alongside the rest of the response. Worth skimming once, because knowing the field names is what lets you ask a sharper second question.
Troubleshooting
Setups fail in a small number of ways, and the symptom usually names the cause.
Symptom | Fix |
|---|---|
401 or invalid token | The variable is not visible to the client. Set it system wide (or in the env block of the config) and fully restart the client. |
Tools do not appear | Wrong config file path or a JSON syntax error. Validate the JSON, check the path for your OS, restart the client. |
npx not found | Node.js is not installed, or the client cannot see your PATH. Install Node LTS or switch to the hosted endpoint. |
Quota or rate limit errors | The plan’s monthly request limit is reached. Check usage in the ipstack dashboard and see the ipstack pricing plans for higher volumes. |
Timeouts on the remote endpoint | A corporate proxy or firewall is blocking mcp.apilayer.com. Switch to the local npx mode. |
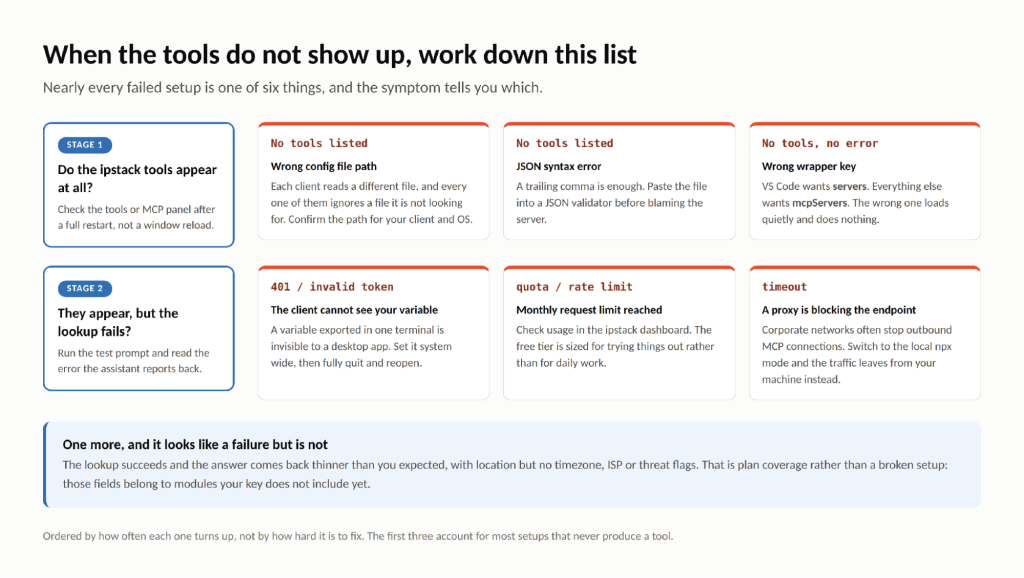
One pattern is worth naming because it looks like none of the rows above. The tools are listed, the lookup succeeds, and the answer is simply shorter than you expected. Nothing has gone wrong; the response carried the fields your plan covers and the assistant summarised what it received.
Rate Limits, Security, and Production Notes
- MCP calls draw from the same monthly quota as normal ipstack API calls; there is no separate MCP meter.
- Never hardcode the token in a config file committed to git. The {env:…} reference exists so the key never appears in the file.
- The free plan is enough for this entire tutorial. The security module fields (proxy, VPN, and Tor flags) require an applicable plan.
The shared quota deserves a sentence of arithmetic, because it surprises people who connect several clients at once. Four assistants on one token do not get four allowances; they get one, and an agent that decides to check a list of addresses can move through a month’s worth of a small plan in a single conversation. If you connect the server everywhere, glance at the dashboard after the first week and calibrate from real numbers rather than from what feels reasonable.
Frequently asked questions
Can I use one token across Claude and Cursor at the same time?
Yes. The same APILAYER_MCP_TOKEN works in every client simultaneously; each one simply opens its own connection to the ipstack MCP server. All requests draw from the same ipstack plan quota, so heavy use across several assistants counts against one monthly allowance.
Does the ipstack MCP server cost extra?
No. MCP requests bill against your normal ipstack plan exactly like REST calls, with no separate subscription or per tool fee. You can complete this entire setup on the free plan, which requires no credit card.
How do I rotate the token?
Generate a new API key in your ipstack dashboard, update the APILAYER_MCP_TOKEN environment variable on each machine, and restart your AI clients. Because the config references the variable rather than the raw key, you never need to edit the JSON itself.
Does the ipstack MCP server support bulk lookups?
Yes. The Bulk Lookup tool accepts up to 50 IP addresses in a single call, which is ideal for triaging log excerpts or alert batches. For larger sets, split the list into chunks of 50 and ask the assistant to process them sequentially and merge the results.
Try ipstack free
IP-to-location, ASN, ISP, time zone and threat data from one endpoint. Get a key and make your first call in under a minute.

Karam Alsalhani
All articles by Karam →